Tuesday, July 24, 2012

Before and Afters

I don't really keep up on this blog. I'm quite sure I am the only one who ever sees it, but I wanted update it anyway. I want to have a place with all of my-well OUR projects. Joe and I did these together. With some of them he did all the work himself, and I just told him how I wanted it. Most we did together. Here they are:
                       The Hutch. We paid actually a lot ($70) for this bad boy, but he's our 2nd favorite piece. We kept him for ourselves.
After a LOT of red and white paint.The backing is just a piece of cardboard cut to size and covered with fabric.
 After we sanded the edges we rubbed black stain into the raw wood hoping that it would stain the wood, but wipe off of the paint. it hardly wiped off at all, but it still looked nice. I'm still reserving the right to sell him at some point. I'm hoping to make some big bucks off of him.
 The Hawkeye dresser! This piece we sold to a family who was redoing their 12 yr old son's room with a hawkeye theme. I'm not sure if we sold it for $100 or $150. I can't remember.

On the inside of the drawers we mod podged black and white scrapbook paper, and then painted a clear coat of poly so it wouldn't peel off.
 The small investment:  This bad boy was super cheap. We got him from a craiglist post for somewhere between $5 and $20-I can't remember.
 We used our leftover black paint that we already had and sold him for $150. Boom goes that dynamite!
 My sewing desk:  I think we paid around $30 for this at goodwill.
 Now she is my sewing desk/makeup vanity in my bedroom. easy peasy.

 Free dresser Joe found  by a dumpster at an apartment parking lot. I don't have a before picture, but we slapped some generic black paint and make a quick $50.
 The boys' table. I got this at a yard sale for $22. We used it and abused it for about 3 yrs as seen in this picture. Right before we made our last move we needed to make some money so I decided to say goodbye to it.
 I still had enough leftover teal pain to cover this. I also had some chalkboard paint I'd purchased 2 yrs before for $13, but I'd never opened. So I taped off the top and made this into a fun chalk-top table. A woman bought it for $50 her daughter who was 2. 
And this is our crowning jewel. Our orange dresser. Her detailed remake is in the previous post, but for the sake of having everything in one place, I added her to this one as well.
Before-kind of. This is after we sanded first:
 and added some wood glue to the rough spots
 Red coat.
 invisible crackle paint, and then orange on top.
 She's our favorite. We keep her as our TV stand in our living room. I will NEVER sell her.
So that's most of what we've done. The biggest projects, anyway.  I hope this serves as inspiration to your (or my) next project!

Sunday, August 8, 2010

Bringing Orange to the 20's

This was my first experience with an antique piece of furniture. This piece is, to date, my favorite. The result was great but more than that I think I love this dresser because of the time and effort that was put into it. Jessica had great vision when she chose the style and colors for the paint. When she first suggested that we go with a burnt orange color I was very skeptical that we would be able to pull it off but I was supportive.

We found this dresser at the local goodwill store for $16. Cosmetically it was really hurting. It was extremely unsturdy, the veneer was peeling off in many places, and the middle large drawer was broken and unusable. I figured that for the price it was worth a try to see if I could actually fix and restore this antique dresser.

Here are the 'Before' shots:
Beautiful old drawer pulls


Exteme damage on the bottom drawers veneer.

I felt it necessary to sand the dresser completely


Saturday, August 7, 2010

Legendary Letters

For Jessica's 22nd birthday I gave her a Hawkeye hoody and some wooden letters that spelled Ethan and Noah. I thought it could be a fun project to paint them the colors of the boys crib sets and we could hang them above each crib. Jessica got way more creative than I did and she came up with some ideas of how to paint them. Before the letters went on the walls, the boys room was bare. We had one small picture on one wall and that was it. This one simple creative paint job changed the boys room from an empty cell into their own special place. They each had their own crib now and they loved it. After we finished the ones for Ethan and Noah, some of our friends asked if we would make some for them. We felt it was a nice gift to celebrate new babies being born. These were the boys crib colors that we did our best to match. We also tried to stay with the circle patterens.We used just the basic acrylic toll paints that can be purchased at Walmart or any other crafty store. The paint itself was not very expensive and the letters at walmart were about $1.70 each.
The larger but thinner circles were made just by rolling a piece of cardstock paper and dipping in the paint. The smaller solid circles were made using the cheap orange earplugs that you would find in the hunting and gun section. They are about a centimeter in diameter and worked perfect for what we wanted. The earplugs do start to swell as they get filled with paint so you need to replace them every once in a while.

This is one we did for one of our friends in Wisconsin

This one we did for my sister when she had her first baby.

The Corner Cabinet

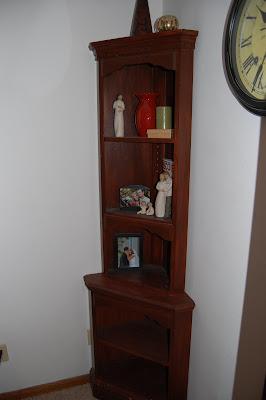
This was our first ever DIY project we did together. Like most folks out there we spent the first couple of year of our marriage living in a basement apartment and our furniture was quite uneventful. Almost everything we had was purchased used from a thrift store or had been given to us. We found this corner cabinet at a yard sale for super cheap. It was just raw pine wood at the time we bought it and looked a little flimsy but we saw hidden potential. We just went to Walmart and purchased the cheapest dark stain we could find. I dont remember the brand or anything but I'm sure any will do. We applied the stain as though it was paint because the pine didn't have any natural wood grains we wanted to expose. Normally with a nice piece of wood and stain you put the stain on and wipe off the excess. We did not wipe any off in hopes of having full coverage of the wood. Though not entirely intentional, we stained the piece a little unevenly but the effect was great. It made it look like a more solid hard wood piece and created a faux wood grain feel. After it was complete it almost seemed too nice to go with the rest of the furniture. This one piece changed our basement college apartment and gave it a small touch of class. Sorry that I don't have any 'before' pictures of it. If you noticed, we dont put anything on the lower shelves because the boys would destroy it.


Welcome

My name is Joseph. My wife Jessica and I live in St. Joseph, MO and we have four and a half year old twin boys and a six month old little girl

Jessica has a grand gift. Everything around her becomes beautiful. Anything she puts her heart into becomes something to behold. I am not sure how she does it but I love her for it. I know that she has something very special inside of her and I am glad she chose me to be the one by her side when she lets it all out. So far I have only seen glimpses of her creativity and beautiful mind, and I want to share them with you.

Jessica has not only changed my outlook on style, fashion, furniture, home decor, etc. but has helped me to see that One Piece Changes Everything. One bright light can fill an entire room. One gorgeous furniture piece can change the mood of a room and the individuals therein. One great piece of junk can become one great treasure. One amazing wife and mother can change my world and the world of those around her.

So, without further ado, here is my first attempt at blogging and I hope our craft blog will help inspire you to do as Jessica does and create something beautiful.